
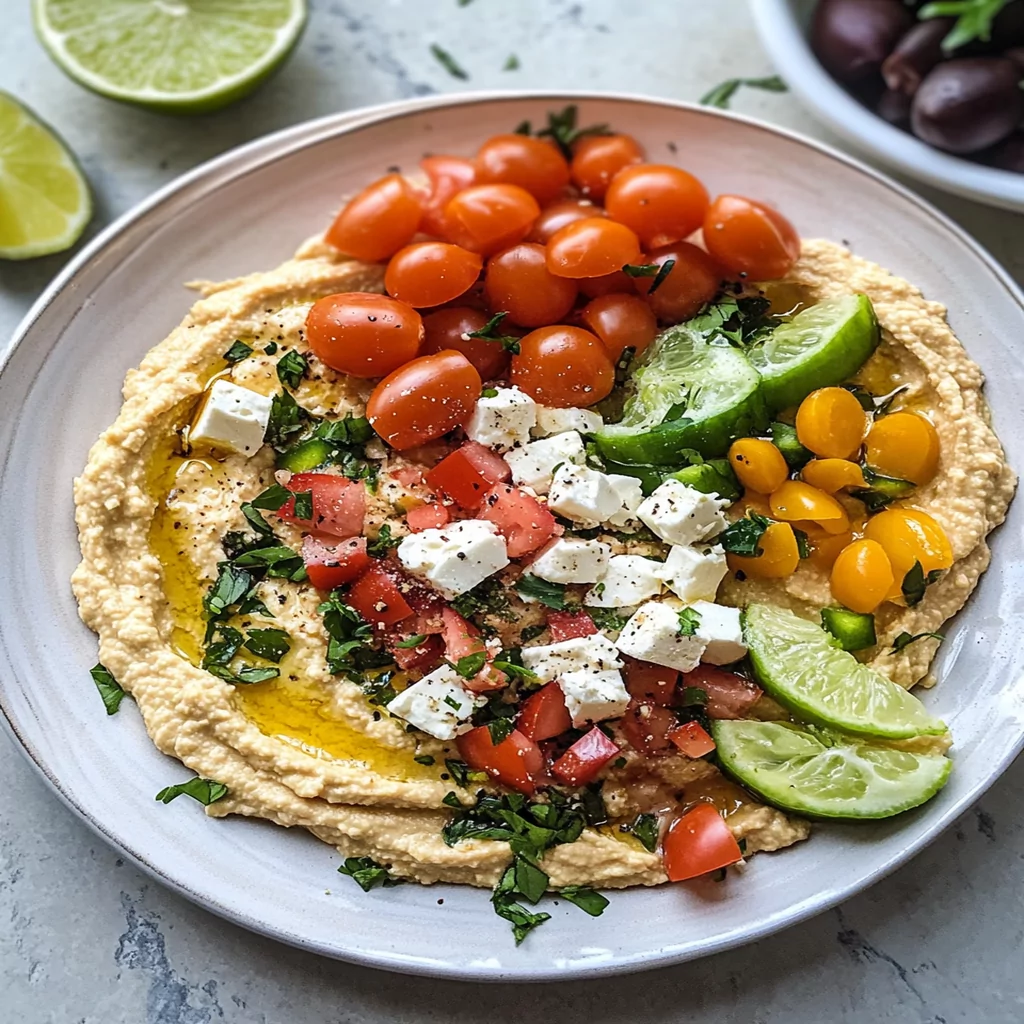
If you’re looking for a dish that combines creamy texture with a burst of flavor, look no further than Greek Style Loaded Hummus. This delightful dip is not only visually appealing but also packed with nutrients. Made from simple ingredients like chickpeas, tahini, and olive oil, it’s an excellent choice for health-conscious food lovers. In just a few steps, you can transform this classic Middle Eastern dish into a Mediterranean masterpiece by adding fresh toppings like diced cucumbers, ripe tomatoes, olives, and crumbled feta cheese.
Greek Style Loaded Hummus is perfect for entertaining guests or as a delicious snack during movie nights at home. Serve it with warm pita bread or crunchy vegetable sticks for an irresistible treat that everyone will enjoy. The best part? This recipe is incredibly versatile; you can customize the toppings to suit your taste preferences or dietary needs. Whether you are hosting a summer barbecue or just need a quick snack on the go, this hummus will not disappoint!
In this article, we will explore the main ingredients needed to create this scrumptious dish and provide you with detailed step-by-step instructions on how to prepare it. Plus, we’ll share some useful serving and storing tips so that your hummus stays fresh and tasty. Get ready to impress your friends and family with this delectable Greek Style Loaded Hummus!
Main Ingredients
Chickpeas
Chickpeas are the star of our Greek Style Loaded Hummus. These legumes are high in protein and fiber, making them an excellent choice for anyone looking to maintain a healthy diet. For this recipe, you will need one can (15 ounces) of chickpeas or about 1½ cups of cooked chickpeas. Rinse them well under cold water to remove excess sodium if using canned beans. This step enhances the flavor while ensuring your hummus remains creamy rather than gritty.
Tahini
Tahini is a key ingredient in traditional hummus recipes; it adds richness and depth to your dish. You will need ¼ cup of tahini for this recipe. Made from ground sesame seeds, tahini offers a nutty flavor that complements the chickpeas beautifully. Be sure to stir the tahini well before measuring since it can separate in the jar over time.
Olive Oil
High-quality extra virgin olive oil contributes both flavor and smoothness to your Greek Style Loaded Hummus. Use approximately 2 tablespoons of olive oil during preparation and an additional drizzle for garnish before serving. Olive oil is rich in healthy fats and antioxidants; its fruity notes elevate the overall taste of the dish.
Garlic
Garlic adds zestiness to our hummus while providing numerous health benefits such as anti-inflammatory properties. For this recipe, use one large clove of garlic minced finely; adjust according to your taste preference if you love garlic’s bold flavor.
Lemon Juice
Freshly squeezed lemon juice brings brightness and acidity that balance out the creaminess of tahini and olive oil perfectly! You will require about 2 tablespoons of lemon juice from one medium lemon for optimal freshness.
Cumin
Cumin adds warmth and earthiness that enhances the flavors in your Greek Style Loaded Hummus significantly! Just ½ teaspoon is enough to elevate this dish without overpowering other ingredients.
Salt
A pinch of salt enhances all flavors harmoniously—about ½ teaspoon should suffice unless you desire bolder seasoning.

How to Prepare Greek Style Loaded Hummus
Step 1: Blend Base Ingredients
Begin by preparing your base mixture for the hummus. In a high-speed blender or food processor, combine the rinsed chickpeas, tahini, minced garlic clove(s), olive oil (reserve some for garnishing later), fresh lemon juice, cumin powder (if using), and salt into the bowl carefully measured beforehand.
Securely place the lid on top before pulsing until combined—a good rule here is starting low then gradually increasing speed until smooth texture forms! You may need to stop occasionally and scrape down sides with spatula ensuring even blending results throughout entire batch—this ensures no chunky bits remain hidden!
If mixture appears too thick or dry after initial blend attempt? Don’t panic! Simply add small amounts of ice-cold water (one tablespoon at a time) until desired consistency achieved—aiming for silky-smooth finish reminiscent of traditional Middle Eastern-style dips!
Step 2: Taste Test & Adjust Seasoning
After blending achieves desired texture consistency let’s pause here! Before transferring everything into serving bowl do take moment evaluate final product’s flavor profile; adjust seasonings if necessary! You may wish more tanginess? Add splash more fresh lemon juice! Need additional saltiness? Sprinkle pinch more salt directly inside mixture while re-blending briefly—to ensure even distribution throughout entire batch!
Once happy with flavors present? Carefully transfer deliciously creamy creation into prepared serving dish—don’t forget save some reserved olive oil drizzle later!
Step 3: Create Toppings
The beauty behind creating loaded version lies within toppings used—so let’s get creative here! Start layering base ingredients onto prepared plate/dish first before moving onto freshly chopped veggies/herbs next layer up top based preference list below:
– Diced cucumber
– Chopped tomatoes
– Sliced Kalamata olives
– Crumbled feta cheese
– Chopped parsley & mint leaves
Feel free swap out any options listed above depending availability personal preference—just remember keep colors vibrant while ensuring textures contrast nicely against smooth backdrop created earlier!
Once satisfied arrangement made atop hummus? Finish off presentation by drizzling reserved olive oil gently across surface—a little goes long way elevating visual appeal immensely alongside taste enhancement too!
Serving and Storing Tips
Serving Suggestions
When it comes time serve Greek Style Loaded Hummus there are myriad ways enjoy delightful creation! Pairing alongside warm pita bread serves classic option—offering ideal vessel scoop up each bite effortlessly while enjoying creamy goodness inside every morsel consumed! Alternatively cut crunchy raw veggies such as celery sticks carrots radishes bell pepper strips makes healthier accompaniment option too!
For gatherings consider presenting platters showcasing vibrant variety served alongside array colorful dips including tzatziki sauce roasted red pepper dip etc.—creating beautiful display guests won’t resist diving into every chance they get!
Another fun approach involves layering individual portions inside mason jars perfect picnic/family gatherings outdoor events where guests can easily grab their own servings without worrying messes occurring outside home environment.
Storing Leftovers
If by chance leftovers remain after all festivities conclude? No worries here either—it stores quite well when handled properly! Simply transfer any remaining portion into airtight container refrigerate promptly after cooling down room temperature—helping preserve freshness longer periods time!
Leftover Greek Style Loaded Hummus lasts up approx five days stored correctly fridge however recommend consuming sooner rather than later enjoy optimal flavors best enjoyed fresh state possible!
Before serving leftover batches again allow them sit out short period bringing back closer room temperature allowing flavors meld together once more enhancing overall experience during next tasting session!.
With these tips in hand you’re now ready tackle making unforgettable delicious creation share loved ones celebrate together moments around table filled laughter joy meals shared!.
Mistakes to avoid
One common mistake when making Greek Style Loaded Hummus is not using high-quality ingredients. Opt for fresh, organic chickpeas, tahini, and extra virgin olive oil. Poor quality can lead to a bland taste that won’t impress anyone. Always check the labels and choose brands known for their quality.
Another frequent error is overlooking the importance of blending time. Many people rush through this step, resulting in a chunky texture instead of the creamy consistency desired in hummus. Blend your mixture thoroughly until it becomes smooth and velvety. If necessary, add water gradually to achieve your preferred texture.
A third mistake is not balancing flavors properly. Hummus should have a harmonious blend of garlic, lemon, and salt. Adding too much garlic can overpower the dish and make it less enjoyable. Taste as you go to find the right balance between these flavors for your Greek Style Loaded Hummus.
Additionally, some cooks skip garnishing their hummus. A well-presented dish enhances its appeal significantly. Drizzle some olive oil on top and sprinkle paprika or chopped parsley before serving. This creates an inviting look that draws people in.
Lastly, many people store leftover hummus incorrectly. Improper storage can lead to spoilage or loss of flavor. Ensure you use airtight containers and keep the hummus refrigerated. Properly stored, it can last for several days while maintaining its deliciousness.

Tips and tricks
For perfecting your Greek Style Loaded Hummus, consider using dried chickpeas instead of canned ones. While canned chickpeas are convenient, soaking and cooking dried chickpeas from scratch enhances flavor and texture significantly. The process might take longer but yields a superior dish that stands out.
Another helpful tip is to experiment with additional toppings beyond traditional garnishes. Consider adding roasted red peppers, feta cheese, or olives on top of your hummus for a delightful twist on flavor profiles. These additions not only enhance taste but also contribute visual appeal to your dish.
Keep in mind the importance of acidity in your recipe; lemon juice brightens up the overall flavor profile of Greek Style Loaded Hummus. Experiment with different citrus juices like lime or even vinegar for unique variations while still achieving that refreshing zing.
For those who prefer a spicier kick, try incorporating ingredients such as jalapeños or harissa paste into your hummus mix during blending. Adjusting spice levels allows you to personalize this dish according to preferred heat levels while still enjoying the classic flavors associated with hummus.
Finally, remember that resting your loaded hummus is key before serving it at gatherings or parties. Allowing it some time in the refrigerator helps all flavors meld beautifully together; this simple step enhances overall taste immensely when enjoyed later.
Suggestions for Greek Style Loaded Hummus
When preparing Greek Style Loaded Hummus, consider using fresh herbs like dill or mint as garnishes alongside traditional toppings such as olive oil or paprika. Fresh herbs elevate the dish’s freshness factor exponentially while contributing aromatic notes that complement existing flavors beautifully.
Consider incorporating different textures into your loaded hummus by adding crunchy toppings like toasted pine nuts or finely chopped cucumbers on top just before serving; these elements create an engaging contrast against the smoothness of the base mixture which makes every bite exciting.
If you’re looking for more protein options within this dish without losing its original essence, try adding cooked quinoa directly into your hummus blend prior to serving! This provides added nutrients while maintaining creaminess throughout every scoop enjoyed by guests during gatherings.
For an enriched flavor profile experience tailored specifically towards Mediterranean cuisine lovers—adding sun-dried tomatoes blended directly into the mix can introduce depth previously unexplored! Blending them ensures they meld seamlessly without overpowering other ingredients present within this delightful dip creation!
Finally—don’t shy away from personalizing recipes based solely around personal preferences! Whether it’s adjusting garlic levels downwards due sensitivity concerns or trying different oils altogether—embrace creativity within boundaries ensuring tasty results!
FAQs
What makes Greek Style Loaded Hummus different from regular hummus?
Greek Style Loaded Hummus differs mainly due to its additional toppings and flavor enhancements compared to traditional versions found worldwide! Ingredients such as olives or feta cheese are commonly added atop giving it a distinctive Mediterranean flair while remaining true to classic elements found within typical hums recipes worldwide!
Can I make Greek Style Loaded Hummus ahead of time?
Absolutely! Preparing this delicious dip ahead of time not only allows flavors ample opportunity to meld but also simplifies hosting responsibilities during events! Store in an airtight container in the refrigerator for up to three days before serving accompanied by pita chips or veggies providing convenience without sacrificing taste!
Is there a vegan version of Greek Style Loaded Hummus?
Indeed! Most base ingredients utilized within creating loaded hums are inherently vegan-friendly including chickpeas and tahini! Ensure all optional toppings chosen maintain plant-based status (like avoiding dairy-based cheeses) allowing everyone at gatherings partake freely enjoying delightful dips without concern over dietary restrictions!
What type of bread pairs best with Greek Style Loaded Hummus?
Pita bread reigns supreme when pairing alongside Greek Style Loaded Hummus due to its light texture allowing one easily scoop generous amounts onto each piece! However—feel free experimenting with various options such as naan bread which offers unique flavor dimensions elevating overall dining experience beyond expectations!
How long will leftovers last after preparing my Greek Style Loaded Hummus?
When stored correctly within an airtight container inside refrigerated settings—you can expect leftovers lasting approximately three days before experiencing any noticeable decline regarding quality/flavor profiles ensuring prolonged enjoyment post-preparation efforts put forth originally!
Can I freeze my Greek Style Loaded Hummus?
While freezing loaded humous is possible—it may result in slight changes regarding texture once thawed out later down line causing separation issues potentially needing remixing prior consumption! To ensure maximum enjoyment—it’s best enjoyed fresh whenever possible focusing on culinary experiences brought forth rather than prolonged storage methods used throughout preparation phases initially envisioned!
Conclusion
In summary, making Greek Style Loaded Hummus requires attention to detail and understanding common pitfalls along with effective tips for enhancement! Focus on high-quality ingredients while ensuring proper blending techniques yield optimal results concerning both texture and flavor harmonization throughout each component introduced into final product served proudly upon presentation occasions alike!
Experimentation remains key when crafting unique variations tailored specifically towards preferences expressed amongst guests enjoying delightful experiences shared together! Remember—the beauty lies within personal touches added through creative exploration ultimately leading towards unforgettable culinary moments cherished long after sharing delectable dishes prepared lovingly together among friends/family alike!
With careful consideration devoted towards ingredient selections alongside preparation practices employed—successfully creating delightful versions showcasing vibrant tastes derived from Mediterranean roots becomes achievable ultimately culminating within satisfying indulgences appealing palates everywhere worldwide today!
Print
Greek Style Loaded Hummus
- Prep Time: 10 minutes
- Total Time: 10 minutes
Description
A creamy and flavorful hummus topped with fresh veggies, feta cheese, and herbs—perfect for any gathering or as a healthy snack! This Greek Style Loaded Hummus is a delicious twist on the classic, packed with protein, fiber, and healthy fats.
Ingredients
- 1 can (15 oz) chickpeas, rinsed or 1½ cups cooked chickpeas
- ¼ cup tahini
- 2 tbsp extra virgin olive oil (plus extra for garnish)
- 1 large garlic clove, minced
- 2 tbsp fresh lemon juice (about 1 lemon)
- ½ tsp ground cumin
- ½ tsp salt
- Toppings:
- Diced cucumber
- Chopped tomatoes
- Sliced Kalamata olives
- Crumbled feta cheese
- Chopped parsley & mint leaves
Instructions
- Blend the Base: In a food processor, combine chickpeas, tahini, garlic, olive oil, lemon juice, cumin, and salt. Blend until smooth, adding ice-cold water if needed for a silky consistency.
- Taste and Adjust: Taste the hummus and adjust seasoning if desired—add more lemon juice for tang or salt for extra flavor.
- Top and Serve: Transfer the hummus to a serving dish and layer with toppings like cucumber, tomatoes, olives, feta, and fresh herbs. Drizzle with reserved olive oil for extra richness.
Notes
- For a thicker hummus, use less water during blending.
- Customize toppings based on your preferences—roasted red peppers or sun-dried tomatoes also make great additions!
- This dish can be made ahead of time and refrigerated for up to 3 days.


Leave a Comment