Christmas is a time for celebration, family gatherings, and of course, delicious food! One of the most enchanting desserts you can make during this festive season is a Christmas Tree Cake. This whimsical treat not only looks like a decorated evergreen but also tastes delightful. Perfect for parties or as a centerpiece on your holiday table, this cake captures the spirit of Christmas in every bite. You will find that making a Christmas Tree Cake is simpler than it appears. With layers of fluffy cake and rich frosting adorned with colorful decorations, you can impress your guests while enjoying the baking process.
In this article, we’ll guide you through creating your very own Christmas Tree Cake from scratch. We’ll cover everything from ingredients to preparation steps and even serving tips to ensure your dessert shines bright during the holiday festivities. Whether you’re an experienced baker or trying your hand at baking for the first time, this recipe is designed to be approachable yet impressive. So roll up your sleeves and get ready to create a sweet masterpiece that embodies the joy of the season!
Main Ingredients
Flour
The foundation of any great cake is flour. For this recipe, all-purpose flour works wonderfully due to its balanced protein content which gives the cake structure without being too dense. You will need about 2 cups of all-purpose flour for this recipe. Sifting the flour before measuring helps to aerate it and remove any lumps. This step ensures that your cake remains light and fluffy after baking.
Sugar
Sugar not only sweetens your cake but also plays a crucial role in its texture. Granulated sugar is ideal for our Christmas Tree Cake; you’ll need around 1 ½ cups for this recipe. Sugar helps to create moisture in the batter during mixing, leading to a tender crumb once baked. Additionally, it aids in browning the cake’s surface as it bakes in the oven.
Butter
Butter adds richness and flavor to our cake while contributing to its moistness. Use unsalted butter for precise control over salt levels; you will require about ½ cup (1 stick) at room temperature for easy mixing with sugar and eggs. Creaming butter with sugar creates air pockets that help your cake rise beautifully in the oven.
Eggs
Eggs act as binding agents in baked goods while adding moisture and structure. For our recipe, we use three large eggs at room temperature to ensure even mixing and better volume when whipped with sugar and butter. The proteins in eggs provide stability and help lift our cake as it bakes.
Baking Powder
Baking powder is essential for leavening our cake; it helps create that light texture we desire in cakes. We will use around 2 teaspoons of baking powder in our mixture which works alongside eggs to give rise during baking. Always check that your baking powder is fresh before using it to guarantee optimal results.
Vanilla Extract
Vanilla extract contributes an aromatic sweetness that enhances the overall flavor profile of our Christmas Tree Cake. Use pure vanilla extract if possible; we’ll need about 2 teaspoons for this recipe to impart a delightful fragrance that complements the other ingredients beautifully.
Milk
Milk adds moisture and richness while balancing out dry ingredients like flour and sugar in our batter. We’ll use about ¾ cup of whole milk for this recipe which should be at room temperature for easy incorporation into the mixture. Milk also helps maintain tenderness in our final product.

How to Prepare Christmas Tree Cake
Step One: Preheat Your Oven
Begin by preheating your oven to 350°F (175°C). This step prepares your oven environment for optimal baking conditions right from the start. While it heats up, prepare two round 9-inch cake pans by greasing them with butter or cooking spray and lightly dusting them with flour—this prevents sticking after baking.
Step Two: Mix Dry Ingredients
In a medium bowl, whisk together your all-purpose flour and baking powder until well combined; set aside this mixture temporarily as you focus on creaming butter and sugar next. Mixing these dry ingredients first ensures even distribution of leavening agents throughout the batter.
Step Three: Cream Butter and Sugar
In a large mixing bowl or stand mixer fitted with a paddle attachment, cream together your room-temperature unsalted butter (½ cup) with granulated sugar (1 ½ cups). Beat on medium speed until light and fluffy—this typically takes around three minutes—ensuring that no lumps remain visible within the mixture.
Step Four: Add Eggs One By One
Next, add each egg individually into the creamed butter-sugar mixture while continuing to mix on low speed after each addition until fully incorporated before adding another egg (total of three). Scraping down sides as necessary allows you to achieve an even consistency throughout without missing any unmixed portions lurking along edges.
Step Five: Combine Dry Ingredients with Wet Mixture
Now it’s time to alternate adding your previously whisked dry ingredient mix (flour & baking powder) followed by whole milk (¾ cup) into this combined wet mixture slowly while mixing on low speed continuously until just incorporated—about one minute should suffice here—not overmixing prevents developing gluten which could lead us towards denser cakes!
Step Six: Pour Batter into Prepared Pans
Divide evenly between both prepared round pans ensuring they are filled no more than halfway full allowing space for rising during baking! Smooth out tops gently using an offset spatula if needed before placing those pans directly into preheated oven where they will bake undisturbed for approximately twenty-five minutes or until toothpick inserted comes out clean!
Step Seven: Cool Cakes Completely Before Frosting
After removing from oven let cool inside pans set over wire racks for ten minutes then carefully invert onto racks allowing them cool entirely before decorating them later—it’s crucial not rushing through cooling phase here since warm cakes can lead melted frosting disasters!

Serving and Storing Tips
Serving Your Christmas Tree Cake
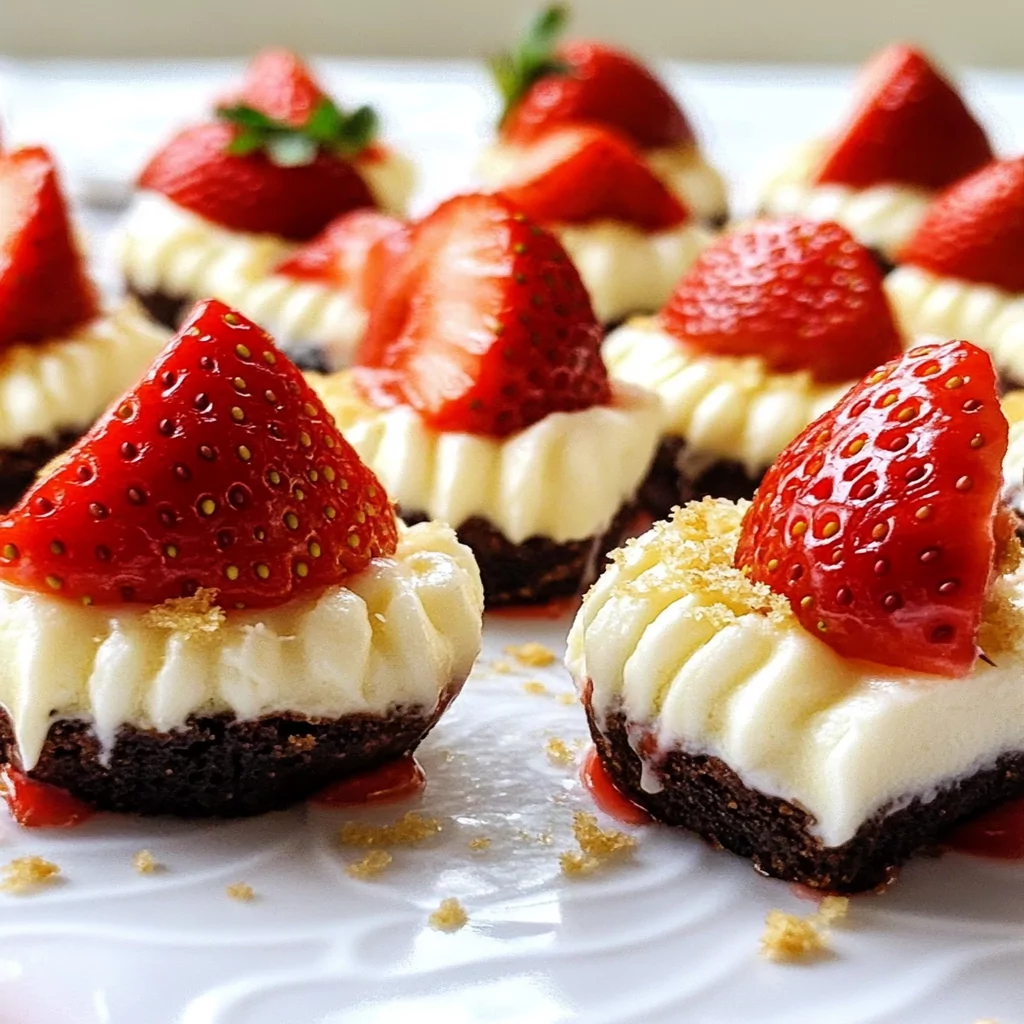
When serving your beautiful Christmas Tree Cake ensure each slice reflects its festive charm! Consider slicing into triangular pieces reminiscent of tree slices paired alongside fresh fruits like strawberries or raspberries which complement flavors wonderfully whilst enhancing visual appeal—a garnish option includes mint leaves creating contrast against vibrant colors!
For added flair consider dusting powdered sugar over top resembling freshly fallen snow transforming any ordinary presentation into an extraordinary one! Pair slices alongside hot cocoa or mulled wine providing comforting warmth accompanying delightful sweetness served straight from kitchen—a truly joyful experience awaits every guest gathering around holiday table!
Storing Leftovers Properly
Should there happen leftovers after joyous celebrations storing them correctly ensures longevity preserving freshness till next indulgent moment arises! Wrap individual slices tightly using plastic wrap placing inside airtight containers preventing air exposure leading dryness whilst retaining delectable taste achieved through careful preparation efforts made earlier!
Refrigerating stored portions extends life up-to five days thus allowing savoring delightful flavors longer than anticipated—if longer storage desired consider freezing portions instead wrapping securely before placing within freezer bags labeled clearly indicating date made ensuring easy identification later when cravings arise unexpectedly amidst winter wonderland backdrop surrounding us!
With these tips outlined enjoy every bite knowing you’ve mastered creation behind magical dessert bringing smiles amongst loved ones celebrating togetherness wrapped within delicious layers reflecting true essence found within holiday spirit itself—all thanks attributed back towards fantastic journey undertaken towards crafting unforgettable masterpiece known simply as “Christmas Tree Cake!”
Mistakes to avoid
When making a Christmas Tree Cake, several common mistakes can hinder your success. One major error is not using enough food coloring for the frosting. Many bakers underestimate the intensity of color needed to achieve that vibrant green hue reminiscent of a holiday tree. Start with a small amount of gel food coloring and gradually increase until you reach your desired shade. Remember, it’s easier to add more than to try and fix an overly dark frosting.
Another mistake is neglecting to chill the cake layers before assembly. If you skip this step, the layers may shift or crumble when stacking. Chilling provides stability, ensuring that your cake holds its shape as you decorate it. Wrap each layer in plastic wrap and refrigerate them for at least an hour before frosting.
Additionally, many people forget about flavor layering. A Christmas Tree Cake isn’t just visually appealing; it should also taste amazing! Consider infusing flavors into your cake batter or using flavored fillings between layers. Vanilla buttercream is classic, but peppermint or chocolate ganache can add a delightful twist that enhances the festive feel of your cake.
Overcomplicating the decorations is another common pitfall. While intricate designs are beautiful, they can be overwhelming and time-consuming. Focus on a few key elements, such as simple star decorations or edible glitter, to create a stunning effect without stress. Remember that simplicity often leads to elegance.
Finally, don’t overlook the importance of even baking. Uneven layers can lead to a lopsided tree. To ensure consistency, use an oven thermometer to check your oven’s temperature and rotate your cakes halfway through baking for even heat distribution.

Tips and tricks
Creating the perfect Christmas Tree Cake involves various tips and tricks that can elevate both its appearance and taste. First, consider using a sturdy cake recipe designed for stacking. Cakes like pound cake or chiffon are great choices as they provide the support necessary for multiple layers while maintaining a moist texture.
When it comes to frosting techniques, mastering the “ruffle” method can add incredible visual appeal. Use a piping bag fitted with a star tip to create ruffled edges mimicking pine needles on your cake’s surface. Practice on parchment paper if you’re unfamiliar; this allows you to refine your technique without worrying about ruining your final product.
Incorporating edible decorations can enhance the festive look of your Christmas Tree Cake greatly. Use candy cane pieces or chocolate ornaments strategically placed around the base of the tree for added charm and flavor contrast. Edible glitter sprinkled on top can also give it that magical holiday sparkle without much effort.
Consider using dowels for support if you’re stacking multiple tiers in your design. This will prevent any collapsing during transport or serving, ensuring that your creation remains intact until it’s time to enjoy it.
Lastly, don’t forget about presentation! A beautiful cake stand can make all the difference in showcasing your Christmas Tree Cake at holiday gatherings. Choose one that complements your cake’s colors and theme; this small detail will enhance its overall festive appeal.
Suggestions for Christmas Tree Cake
To truly impress during holiday gatherings with your Christmas Tree Cake, consider several suggestions beyond basic decoration techniques. One idea is incorporating seasonal flavors into every layer of your cake. Adding spices like nutmeg or cinnamon into your batter can evoke warm memories associated with winter holidays while enhancing flavor profiles.
Another suggestion is creating a “surprise” filling within the layers of your cake. For instance, adding cranberry sauce between layers introduces an unexpected tartness that pairs beautifully with sweet vanilla frosting—an element that guests will love discovering while enjoying their slices.
Don’t hesitate to play with textures in both frosting and filling! Consider alternating smooth buttercream with crunchy toppings like crushed nuts or cookie crumbs for added depth in every bite.
Experimenting with different sizes and shapes can also yield stunning results—try making mini versions of the Christmas Tree Cake or using cupcake forms shaped like trees for individual servings! These smaller portions allow guests to sample various flavors without feeling overwhelmed by larger slices.
Lastly, make sure you take advantage of seasonal fruits for garnishing! Fresh pomegranate seeds or sugared cranberries not only add color but also contribute an enjoyable burst of freshness against rich frosting layers—perfectly embodying the spirit of celebration!

FAQs
What is a Christmas Tree Cake?
A Christmas Tree Cake is a festive dessert designed to resemble a holiday tree, often decorated in green frosting with various edible ornaments like candies and sprinkles. This whimsical approach makes it perfect for holiday parties and gatherings where impressing guests is key.
How do I store leftover Christmas Tree Cake?
To store leftover Christmas Tree Cake effectively, wrap it tightly in plastic wrap or place it in an airtight container to retain moisture and freshness. Refrigeration generally works best if there are cream cheese components involved; otherwise, keep it at room temperature for up to two days before refrigeration becomes necessary.
Can I make my Christmas Tree Cake ahead of time?
Yes! You can prepare several components ahead of time—a strategy often recommended by experienced bakers. Bake the cake layers up to three days beforehand and freeze them wrapped securely in plastic wrap followed by foil until needed; simply thaw them prior to assembly day!
What flavors work well with a Christmas Tree Cake?
Classic vanilla pairs beautifully with seasonal flavors like peppermint or gingerbread; however, chocolate lovers might prefer rich chocolate ganache layered between vanilla cakes! Experimenting opens possibilities; orange zest mixed into buttercream creates bright notes alongside traditional spices too!
How do I get my frosting smooth?
Achieving smooth frosting requires patience along with proper techniques! Start by applying a “crumb coat” (a thin layer) around all sides before chilling briefly—this locks crumbs away effectively allowing smoother final coats afterward as you pipe additional layers onto cooled surfaces.
Can I personalize my decorations on a Christmas Tree Cake?
Absolutely! Personalizing decorations makes any holiday dessert even more special—consider using family favorites such as homemade ornaments made from fondant or themed characters representing loved ones’ interests as part of this fantastic creation!
Conclusion
Creating a stunning Christmas Tree Cake involves careful planning and attention to detail throughout each step—from choosing the right recipe down through decoration techniques tailored specifically toward festive aesthetics while ensuring delicious flavor profiles remain engagingly balanced within every slice served at gatherings during this joyous season!
By avoiding common mistakes such as improper chilling methods while employing helpful tips like practicing piping techniques ahead-of-time ensures successful execution when crafting visually appealing desserts everyone will enjoy indulging upon celebrations taking place over winter months leading into New Year’s festivities too!
Implementing these suggestions not only enhances appearance but also adds depth through surprising fillings combined alongside thoughtful garnishes elevating overall experience shared amongst friends & family alike during cherished moments spent together around tables set warmly adorned amidst laughter echoing joyfully throughout homes filled cheerfully alive during special times shared across generations year after year!
Print
Christmas Tree Cake
- Prep Time: 25
- Cook Time: 25
- Total Time: 50 minutes
Description
Bring the holiday spirit to your table with this delightful Christmas Tree Cake. Soft, fluffy, and topped with festive decorations, it’s a show-stopping centerpiece and a delicious treat for everyone to enjoy!
Ingredients
- All-Purpose Flour: 2 cups (sifted)
- Granulated Sugar: 1 ½ cups
- Unsalted Butter: ½ cup (softened)
- Eggs: 3 large
- Baking Powder: 2 tsp
- Vanilla Extract: 2 tsp
- Whole Milk: ¾ cup
Instructions
- Preheat Oven: Set oven to 350°F (175°C). Grease and flour two 9-inch round cake pans.
- Mix Dry Ingredients: Whisk flour and baking powder in a bowl; set aside.
- Cream Butter & Sugar: Beat softened butter and sugar until fluffy. Add eggs one at a time, mixing well.
- Combine Wet & Dry: Alternate adding flour mixture and milk into the butter mixture. Stir in vanilla extract.
- Bake: Divide batter evenly into pans. Bake for 25 minutes or until a toothpick comes out clean.
- Cool & Decorate: Cool cakes completely on wire racks before decorating as a Christmas tree.
Notes
- For an extra festive touch, use green frosting and colorful sprinkles to mimic tree decorations.
- Ensure eggs and milk are at room temperature for a smoother batter.
- Overmixing the batter can lead to a dense cake, so mix just until combined.

Leave a Comment